0 Comments
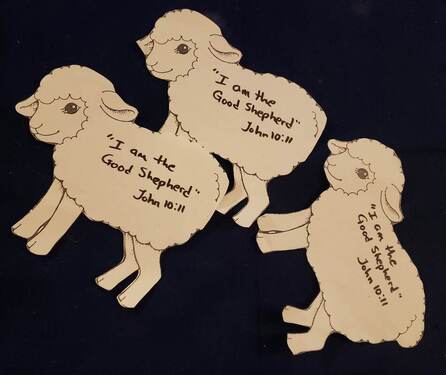 A few weeks ago, we were talking about Jesus as the Good Shepherd and also discussed the Parable of the Lost Sheep. You might think those are two very different stories, but they do go hand-in-hand.
First off, I started by bringing a sheep to class. Before you start calling me Mary, no. It was only a stuffed animal I found in a closet in the church building. But it worked to help me make my points. Then, I discussed various aspects of sheep.
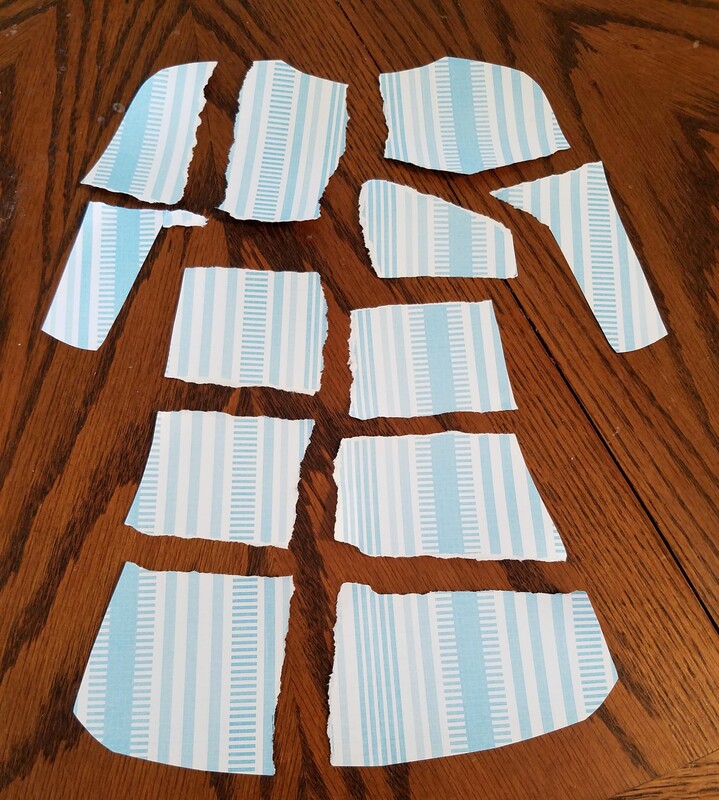
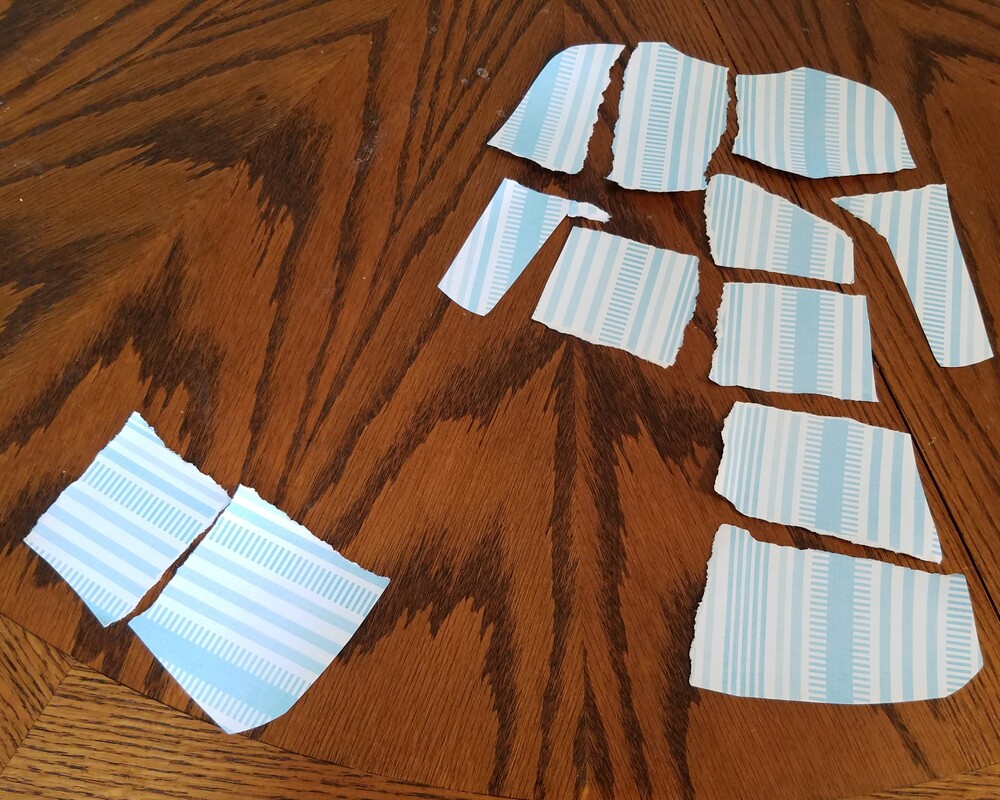
A few weeks ago, I taught the story of Jeroboam and Rehoboam in my Sunday school class. It's found in I Kings 11 and 12. Basically, because Solomon, despite his wisdom, let his various and sundry wives and girlfriends lead him away from worshiping only God, God decided that Rehoboam, Solomon's son, wouldn't get to be king over ALL the tribes of Israel. So, God gave 10 tribes to Jeroboam, one of Solomon's enemies, which became the nation of Israel. Judah and Benjamin stuck with Rehoboam and became the nation of Judah. We started class by labeling a map with approximately where all the different tribes lived in Canaan. Then, I got into the story. Here's my first visual aide. 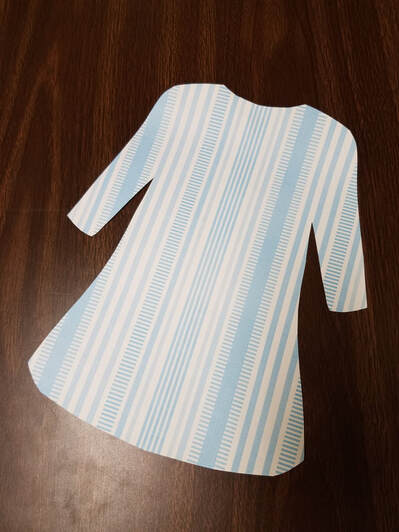 I basically took a piece of scrapbook paper, folded it in half, then cut out a garment shape. This is the new garment that I Kings 11:29 says the prophet Ahijah was wearing. When Ahijah met Jeroboam, he took off his garment and tore it into twelve pieces. While you're telling the story, tear your garment. Then, Ahijah told Jeroboam to take ten pieces for himself because God was going to give him ten tribes to be King over. After that, I talked about Rehoboam's bad decision to listen to his peers instead of the elders. When we get to the part where the Bible says ten tribes followed Jeroboam and only two stayed with Rehoboam, we draw a dashed "line" where the kingdom divided on the map we started class with.
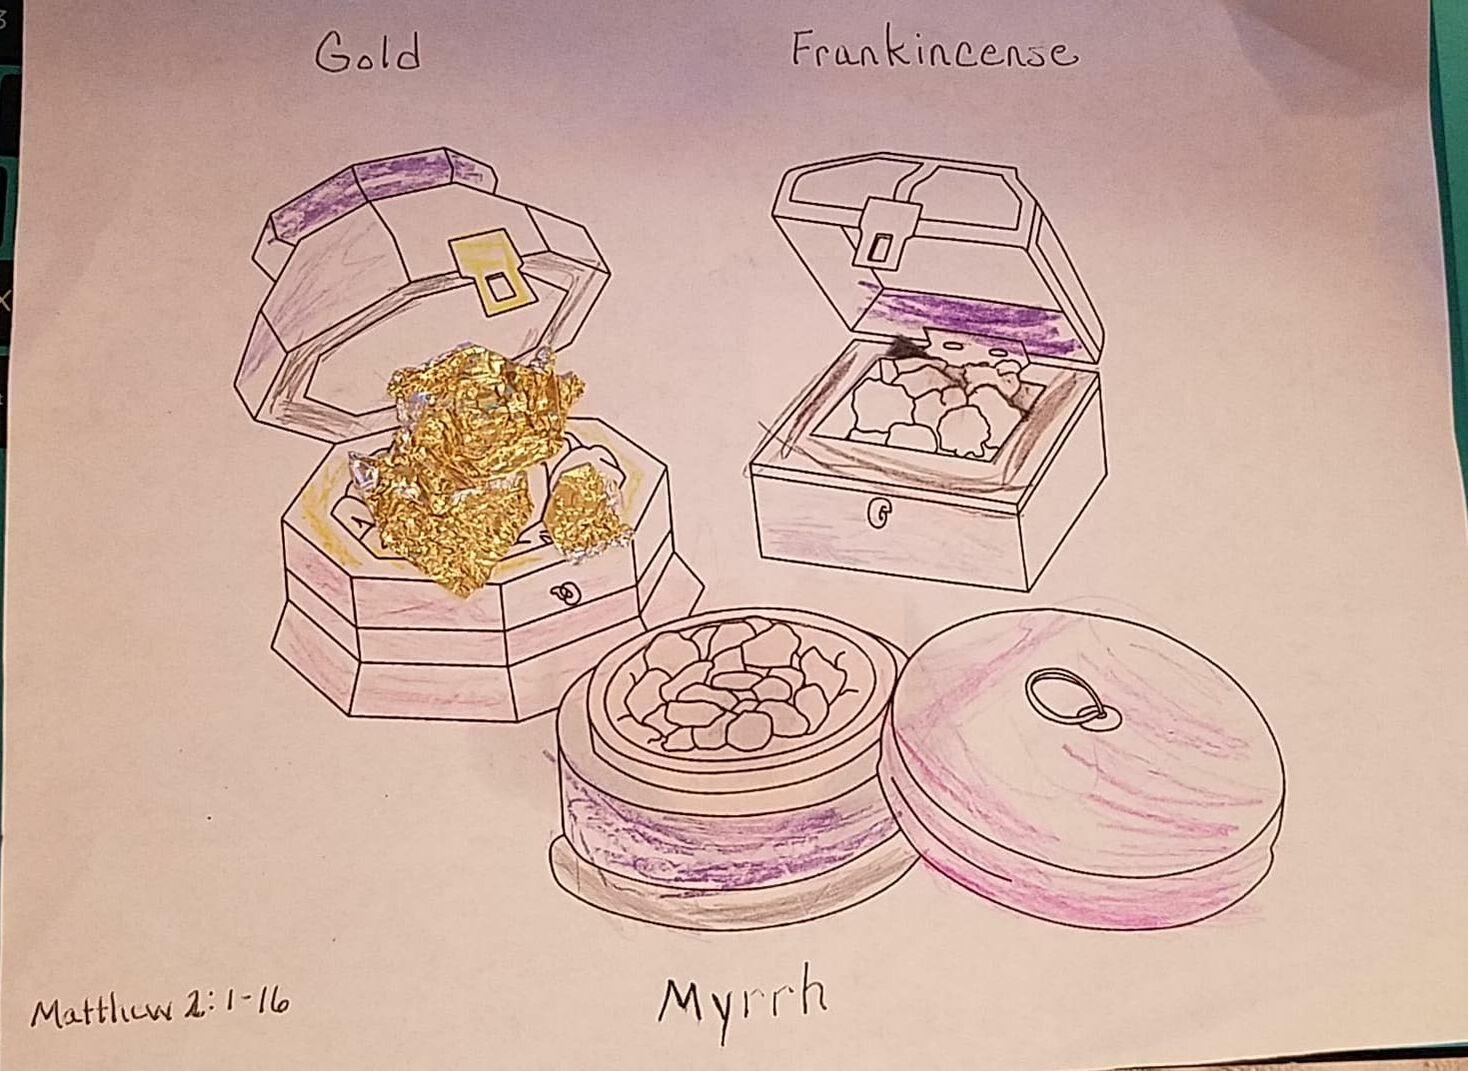
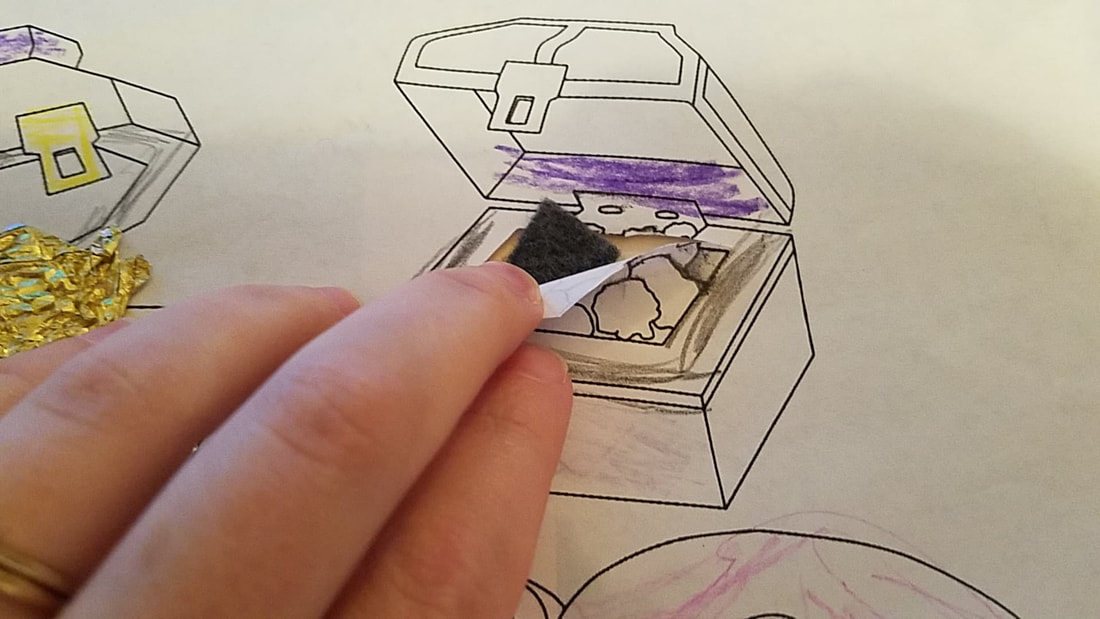
For a take home paper, I let each child have this sheet, which is a garment listed with each of the twelve tribes. They can color it and cut it apart to be a puzzle so they can remember the lesson. I hope this has helped any of you needing to teach this hard lesson in your class. I'd love to hear if you have come up with any other ideas, too. While we were visiting my family for Christmas holidays, my daughter and niece were blessed to have my mom as their Bible class teacher that Sunday. She happened to be covering the lesson of the wise men visiting young Jesus, and when I saw the different things she was using for her lesson, I asked if I could share her ideas with you, in case you need some for the future. Something I've discovered, and she has, too, is that children love to be able to "act out" the story in some way. I made her a set of the Bible peg dolls I did for myself and my sister (and an aunt) last year, and she's put them to good use. If you don't know what I'm talking about, that post is here. The week before, she had used these three for Joseph, Mary and baby Jesus. The house behind them is one my uncle made for her. (If I can sweet talk him into it, I'll post those details later.) For the wise men, she used the king figure I had painted as well as two of the other men figures with a small piece of fabric over their heads to make it look a headdress. 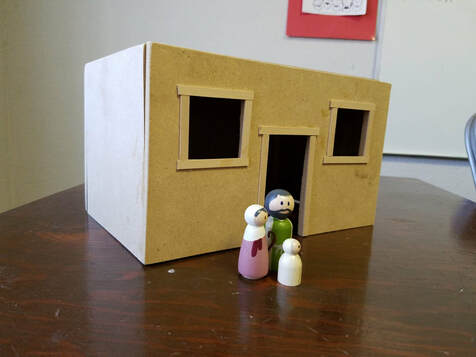 She found this neat set of animals in the Christmas products at Michaels and knew immediately that they'd work for her Bible class. Aren't they cute? I wish I'd had time to head to that store, too, but maybe next year ... It seems I always need a camel at least once a quarter. Just a great reminder that you never know where you might find a great prop for a Bible lesson. 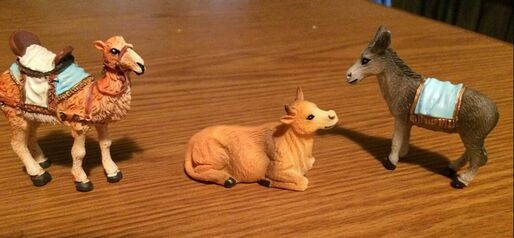 For her craft, she printed out a coloring sheet like the one below and just labeled the different containers to say the gifts that the wise men brought. She let the kids color them as they wanted. Then, they added the gifts. For the gold, she had found some chocolate candies with gold wrappers. They were super excited to get to eat the candy so they could glue the "gold" on their sheets. For the frankincense and myrrh, she had bottles of those two essential oils in her stash. She cut a slit in the paper and had another paper behind it so they wouldn't fall through. Then, she let the students put a drop or two of the oils on a small piece of felt and stick it in the little pocket she had made. That way, they could smell it and get an idea of what it might have been like. I love that idea. Especially with all the different companies that have now made essential oils more affordable. I keep frankincense in my stash, too. It's great for headaches and mood lifters and wrinkles! Think Mary used it for any of that?
I'd love to hear from you. Have you ever used essential oils in a Bible lesson? Got any other neat ideas that are similar to this? Ever taken a coloring sheet and made it more?
"Look toward the heaven, and number the stars, if you are able to number them." Then he said to him, "So shall your offspring be." And he (Abraham) believed the Lord, and he counted it to him as righteousness. --Genesis 15:5-6 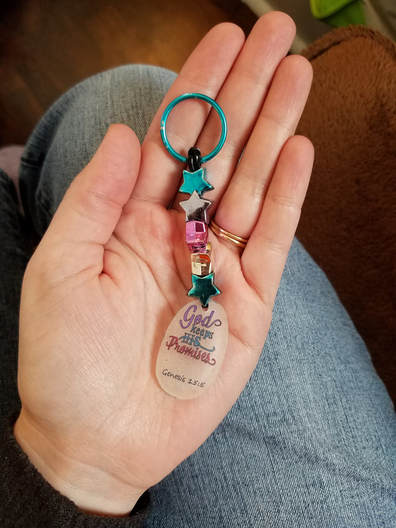 I love the story of Abraham. I guess I compare a lot of the things in his life to mine. Obviously, my family never had to wander around in a tent until God told us to stop (not really, anyway), but we did have to pick up our things and move quite a few times. And then, I can empathize with Sarah and him as they waited and waited and waited for that baby. I'm so grateful God didn't make me wait until I was in my 90s before blessing us with a child. Whew!
As this lesson came up in my curriculum this time, I remembered a few years ago when I taught this. I got the brilliant idea to make key chains or bracelets or zipper pulls with a piece that would remind us that even if it took more than 20 years, God would keep the promises He had made us. Here's how we did it. I have a neat little Shrinky Dink machine like this one. I caught it on sale at a craft store one time and picked it up just for my Bible class. If you don't want to spring for a fancy machine, a toaster oven works just as well. Just buy the special paper and follow the directions. Shrinky Dinks are so fun because you do whatever design you want on the special paper and then watch it magically shrink into the harder plastic piece that works for a bead. I printed out several memes that I had found online that said "God keeps His promises" and printed them out for the students to use for tracing purposes. They picked whichever one they wanted and colored as desired. We then trimmed the piece and punched the hole -- **if you don't do this before you shrink it, you can't do it afterward and it won't work as a bead**. My co-teacher manned the shrinking machine and I helped the kids string their beads together and tie the knots to finish up. We used star beads to remind us of what God told Abraham -- that his family would be as many as the stars. This craft always goes over well with the kids, and while it takes a lot of time, it's something different that should last for quite a time to come. Have you ever done something like this in class before? 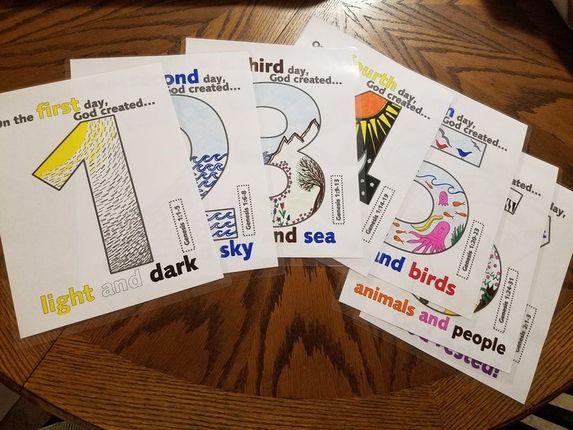 Creation is a fun lesson, and can be taught many ways. I usually incorporate the song, "Day one, day one ..." It's catchy and helps us all remember what happened on which day. I also use my visual aids pictured above. I snagged them here, if you want a copy of your own. There are several others on Pinterest, as well, if you don't love these.
Then, to keep the students' attention, and get them involved, I hand out this sheet. It's a handout that has miniature versions of the numbers, but blank. This lets the kids color in what happened on each day, a task that also helps drive home the lesson. I love when I can get the kids drawing the story along with me. And they seem to like it, too. I'd love to hear from you. What all do you do when you teach this amazing lesson? 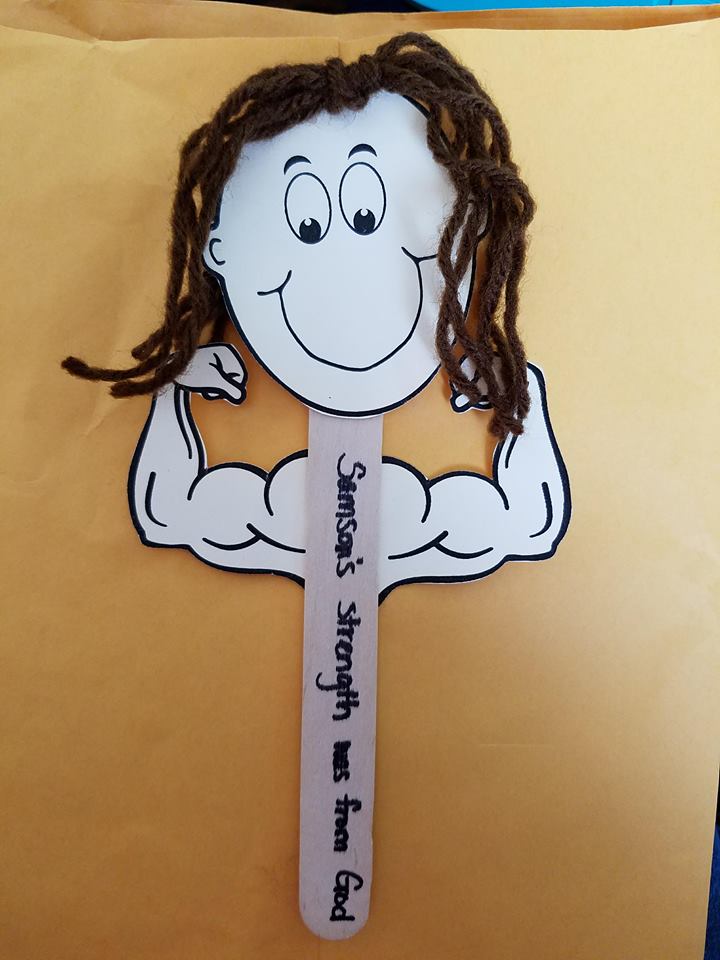 I absolutely love the ideas I find on handsonbibleteacher.com. She always has fun games and songs and crafts. When I was looking for an extra craft for my second graders to do a few weeks ago when we were talking about Samson, I discovered her cute little puppet. Unfortunately, try as I might, I couldn't find a template to make it exactly the same anywhere. So, I got a little creative, and made my own template. I thought there might be others out there looking for the same resource, so I'm sharing it here for anyone who wants to use it. It's fairly plain, but the kids really enjoyed it and they turned out cute. I made it where you can get two puppets from one sheet of cardstock. We just attached the head and arms to craft sticks, gave him some hair, and wrote "Samson got his strength from God." Hope this helps someone else teaching the story of Samson!
|
I am one of those Bible class teachers who can't stand to just present the lesson and then hand out a worksheet. I want whatever I do in class to stick with the kids, reinforce the lesson, and really make them understand that this isn't just a story ... it's something that really happened. I want to include some of the ideas I've come up with here so that I can hopefully help some of you who want the same thing. I'd love to hear your ideas, too!
Archives
May 2024
Categories
All
|
||||||
 RSS Feed
